K8s快速實戰(二)
Kubernetes
Kubernetes又稱k8s由Google建立,發表於2015年,後續被捐獻給了Cloud Native Computing Foundation(CNCF)。 K8s是容器調度工具(Container Orchestration Tool),被設計成一個鬆耦合的元件集合,提供了包含部署、維護、擴展的工作負載功能。
Kubernetes 特色
- 服務發現(Service discovery) 與 負載平衡(Load balancing)
- Storage orchestration (Local&Cloud based)
- 自動化 rollouts and rollbacks
- 自我修復(Self-healing)
- Secret與參數管理
- 統一使用同一種API去管理地端與雲服務的狀態。
說完特色之後,我們來看Kubernetes的架構圖。一張好的架構圖會讓我們更好的了解Kubernetes的運作模式。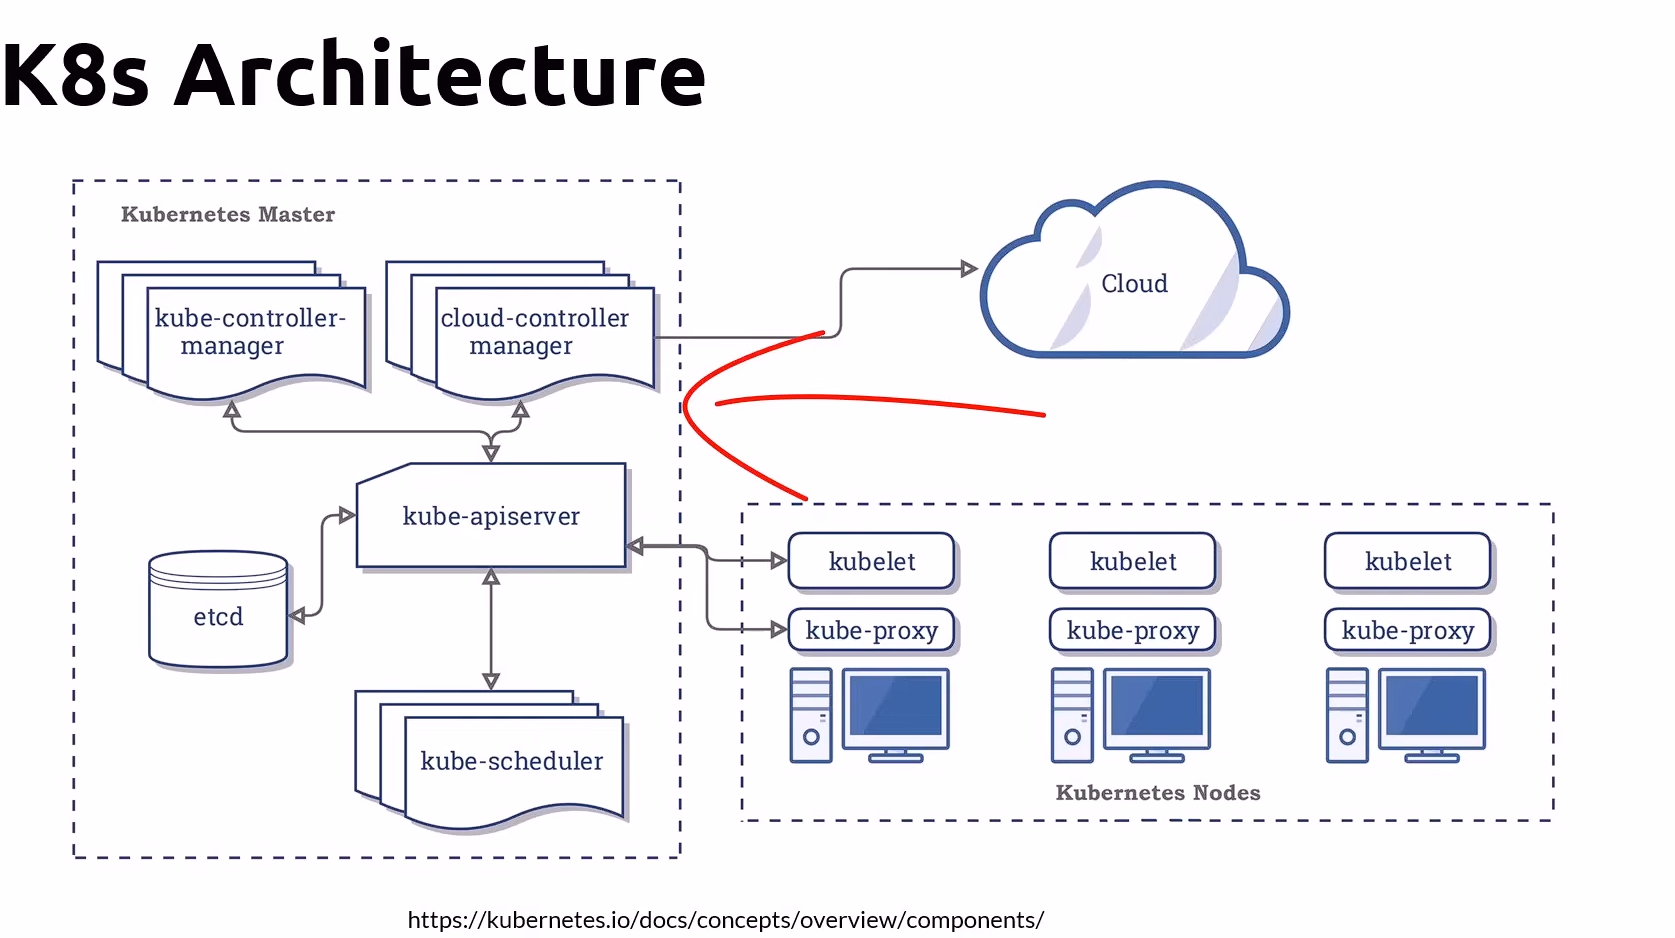
這張架構圖看起來有看沒有懂,我懂,讓我們來拆解一個個Kuberbetes元件,解開一個個你腦海中的問題,將其化為你的知識。
仔細看會發現,這張架構圖主要分為了兩個部分,也就是Kubernetes Control Plane與Kubernetes Worker Nodes。
Kubernetes 架構概觀
Kubernetes 整體分為控制層(Control Plane)與執行層(Worker Nodes)。
- Control Plane:負責決策、調度、維持期望狀態。
- Worker Nodes:實際執行容器的環境。
Kubernetes Control Plane是什麼?
Kubernetes Control Plane就像是所有Kubernetes Node的管理中心,它主要負責管理、調度、監控與協調所有Node的運作。
主要元件如下:
1️⃣ kube-apiserver 是所有組件之間的中樞溝通中心。所有請求(CLI、UI、或控制器)都要透過它。它負責驗證、授權、更新 etcd 中的狀態資料。功用就像是 Kubernetes 的「入口 API Gateway」。
2️⃣ etcd 是一個分散式 Key-Value 資料庫。它儲存整個叢集的狀態(例如 Pod、Service、ConfigMap 等資訊)。kube-apiserver 會與它同步資料,並更新最新的Pod or Service..etc的狀態。
3️⃣ kube-scheduler 決定「Pod 應該跑在哪個 Node 上」。根據資源可用性(CPU、Memory、Affinity、Taints/Tolerations 等)分配 Pod。
簡單來講,Pod就是你的一個服務,而Node就像是你的主機,當現在需要啟動一個新的服務時,假設你擁有多台主機時,你就會需要kube-scheduler來幫你決定你現在要部署的服務應該放置在哪一個主機上面。
4️⃣ kube-controller-manager 內含多種控制器(如 ReplicaSetController、NodeController、EndpointController)。每個控制器都負責維持某個「期望狀態」(例如 Pod 數量、節點健康狀態)。
5️⃣ cloud-controller-manager 這是針對雲端平台(AWS、GCP、Azure)設計的控制器。它會和雲服務 API 溝通(如建立 Load Balancer、掛載雲端磁碟、更新 Node 狀態)。圖上紅色箭頭指的部分,就是它與「Cloud Provider」互動的路徑。
Kubernetes Nodes 是什麼?
如果把Kubernetes Master當成管理中心,Kubernetes Nodes就是被管理的Workers,每一個Node都是實際執行應用容器(Pods)的主機。
Node的主要元件如下:
1️⃣ kubelet是K8s在Node上的代理程式,你可以想像它是Node中的管理中心。它主要功能有:
- 負責接收 API Server(也就是
kube-apiserver) 下發的 Pod Spec,並確保容器依照定義執行。 - 監控在
Node內的Pod狀態,並持續向API Server上報 Node 狀態(例如資源使用量、健康狀況)。 kubectl會透過container-runtime來啟動、停止、監控容器。
2️⃣ kube-proxy管理 Node 上的網路。負責 Service 的虛擬 IP(ClusterIP)與 Pod 之間的流量轉送。讓不同 Node 上的 Pod 能互相通訊。
3️⃣ Container Runtime雖然圖上沒畫,但實際上每個 Node 都需要一個容器運行環境(例如 containerd、CRI-O)。kubelet 會呼叫 runtime 來建立、停止容器。
Pod?Container?Node?
如果用一句話來解釋這些元件的關係,我會說「Container在Pod中被運行,Pod在Node中被運行,所有Node來自一個Cluster」
K8s Component
在運行K8s時,我們可以先了解有關k8s的相關設定,K8s Context是一組設定,包含要連線的Kubernetes Cluster、使用者身份與憑證、預設命名空間,這些來自K8s Context的資訊對日後的開發至關重要。
接著,我們來介紹k8s的各種元件。
Cluster是什麼?
Cluster 是由一組 Master 與 Node 所組成的整體系統,是 Kubernetes 運作的最外層單位。所有 Pod、Service、Deployment 都是 Cluster 內的資源。
Namespaces是什麼?
Namespaces 是 Kubernetes 用來邏輯分隔資源的機制。它的主要用途是:
- 資源隔離:不同團隊、專案或環境(如 dev、staging、prod)可以使用不同的 Namespaces,互不干擾。
- 權限控制:搭配 RBAC(Role-Based Access Control)可以設定誰能操作哪些 Namespaces。
- 資源配額:可以對每個 Namespaces 設定 CPU、記憶體等使用上限。
- 組織管理:讓集群中的資源(Pod、Service、Deployment 等)更有結構地分類。
Nodes是什麼?
- Node pool是一組虛擬機器的集群(Group virtual machine)。集群中同一個pool的VM大小是一樣的。
- 在一個Cluster可以包含多個Node pool
- 每個Cluster裡面的Node可以使用大小不同的 VM。
- 每一個Node pool都可以獨立擴展,與其他Node pool不相干。
關於Node可以參考以下例圖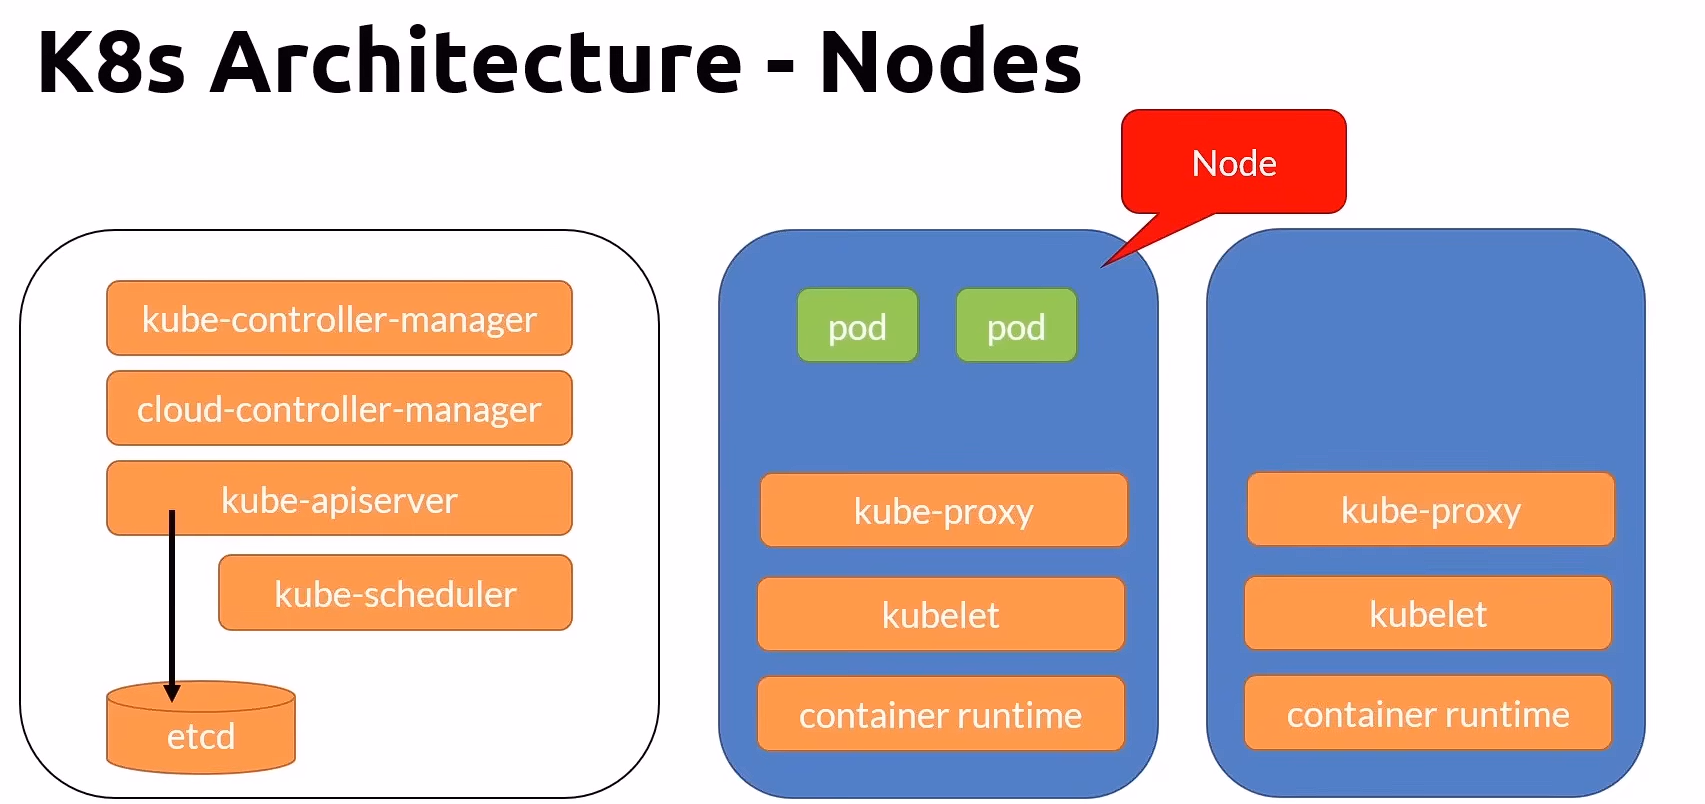
Pods是什麼?
- K8s中最小的部署單位
- 封裝了應用程式容器,一個Pod可包含一個或多個container
- Pod中的Container共享ip address, mounted volumes
- Pod中的Container使用localhost溝通
關於Pod可以參考以下例圖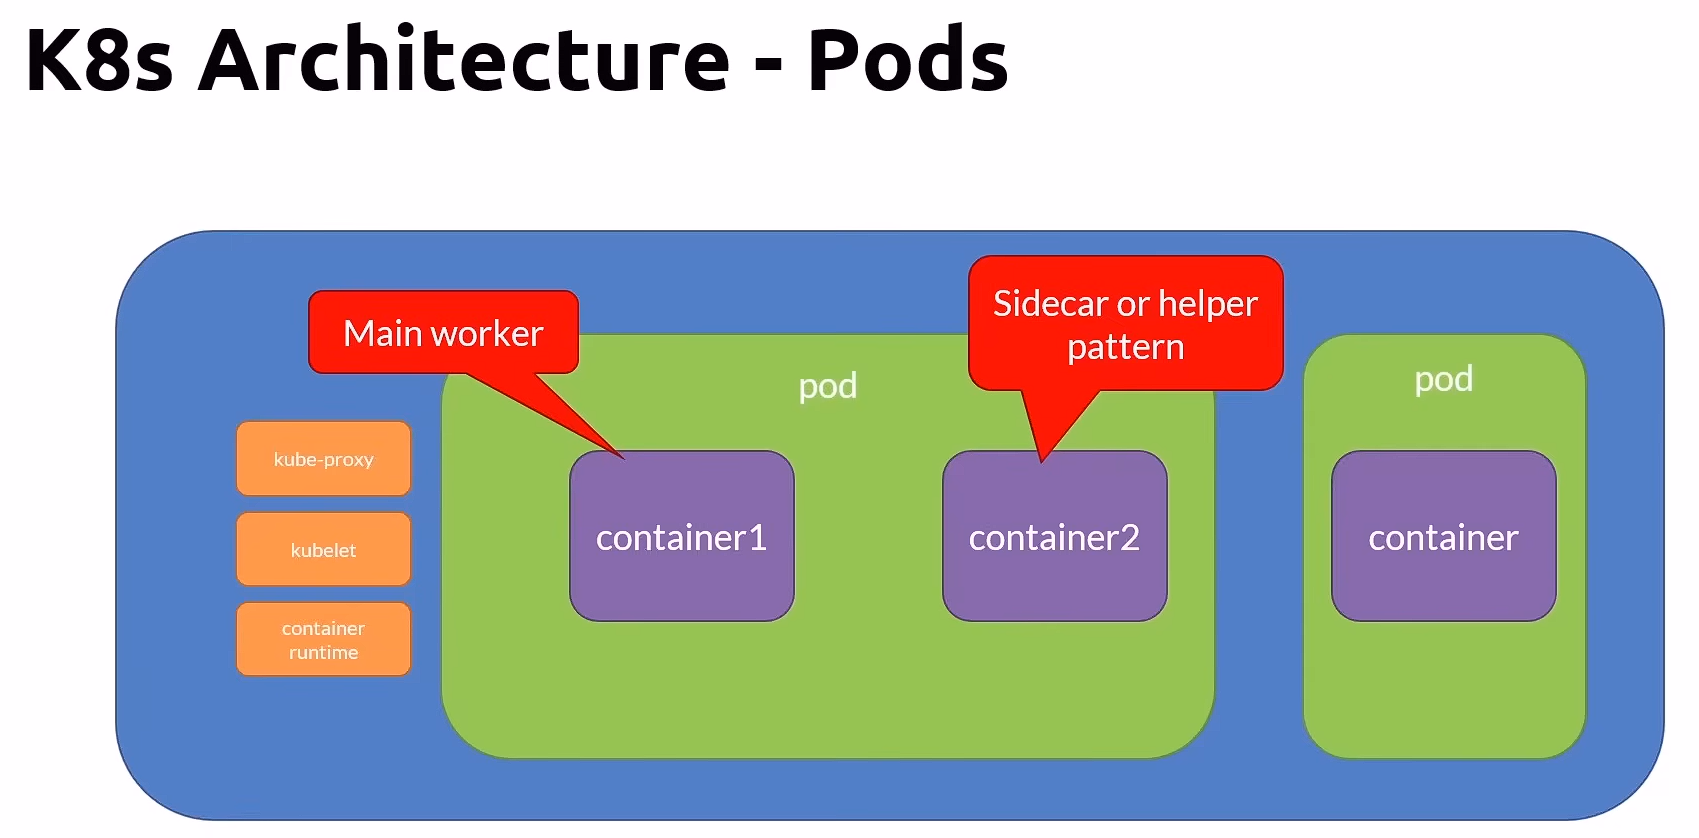
Deployment 是什麼?
Deployment 是用來管理 Pod 的高階抽象。它能自動:
- 滾動更新 Pod
- 維持指定數量(Replica)
- 支援回滾(Rollback)
在實際開發中,我們幾乎不會直接建立 Pod,而是建立 Deployment。
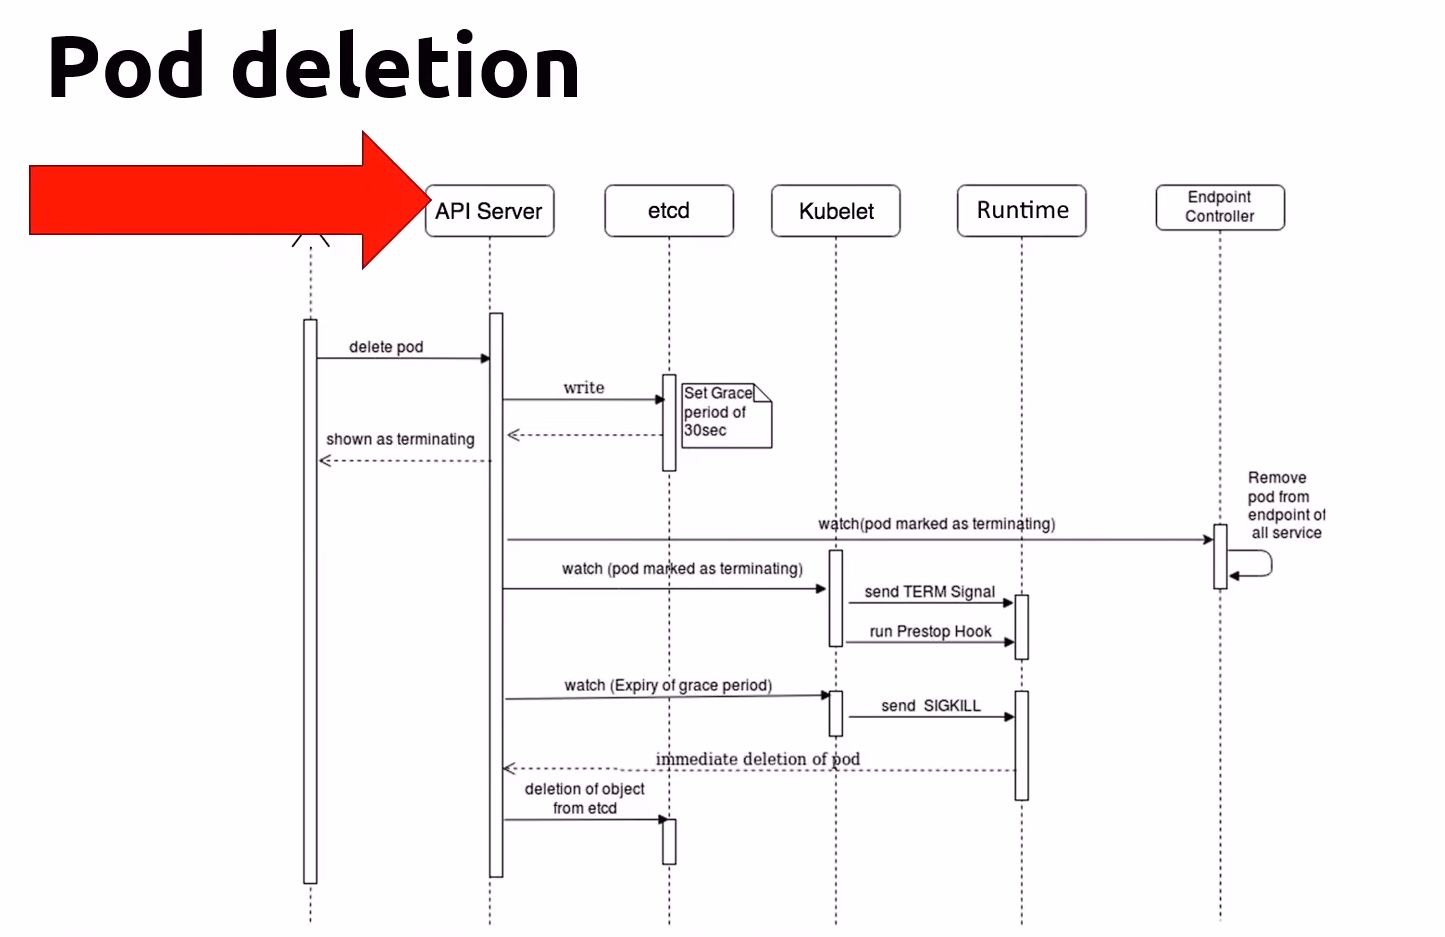
K8s 執行過程
下圖展示了一個Pod的建立/銷毀過程,透過一步步的步驟讓你了解Pod是怎麼被建立/銷毀的,同時一併介紹了其他元件的運作模式。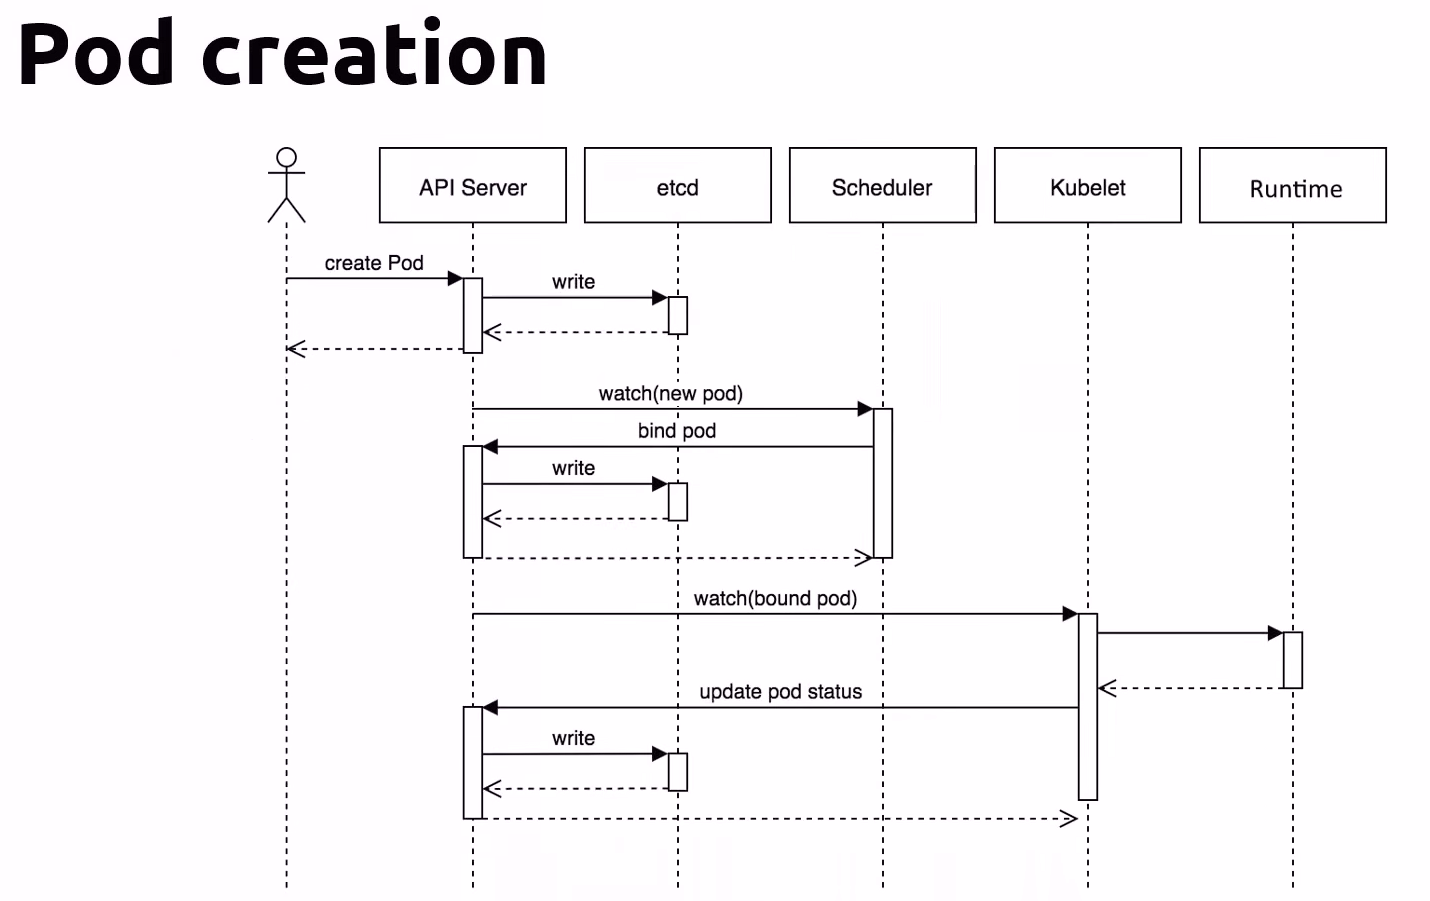
Pod 狀態
- Pending - Accepted but not yet created
- Running - Bound to a node
- Succeeded - Exited with status 0
- Failed - All containers exit and at least one exited with nono-zero status.
- Unknown - Communication issues with the pod
- CrashLoopBackOff - Started, crashed, started again, and then crashed again.
一個 Pod 的 YAML
1 | |
有時我們想要在Pod啟動之前先初始化另外一些Pod
- 使用init Container,Init Container可包含多個,任一失敗就不會運行下一個。
- 如果Init Container失敗,kubelet會重啟它直到成功為止。或者使用restartPolicy設定調整成Never
常見Kubernetes 指令
| Command | Description | |
|---|---|---|
| 1 | kubectl config current-context |
Get the current context |
| 2 | kubectl config get-contexts |
List all context |
| 3 | kubectl config use-context [contextName] |
Set the current context |
| 4 | kubectl ctx [contextName] |
shortcut |
| 5 | kubectl config delete-context [contextName] |
Delete a context from the config file |
| 6 | kubectl create -f deploy.yaml |
Create deployment with yaml |
| 7 | kubectl delete deployment [deploymentName] |
Delete the deployment |
| 8 | kubectl get deployment |
List all deployments |
| NameSpace | ||
| 1 | kubectl get namespace |
List all namespaces |
| 2 | kubectl get ns |
shortcut |
| 3 | kubectl config set-context --current --namespace=[namespaceName] |
Set the current context to tuse a namespace |
| 4 | kubectl create ns [namespaceName] |
Create a namespaces |
| 5 | kubectl delete ns [namespaceName] |
Delete a namespaces |
| 6 | kubectl get pods --all-namespace |
List all pods in all namespaces |
| 7 | kubectl config set-context --current --namespace=[namespaceName] |
Change the namespaces to the docker one and get the pods list |
| Nodes | ||
| 1 | kubectl get nodes |
list all nodes |
| 2 | kubectl describe node |
Get info about the node |
| Pods | ||
| 1 | kubectl create -f [*.yml] |
Create a pod |
| 2 | kubectl run [podName] --image=[imageName] -- /bin/sh -c "sleep 3600" |
Run a pod |
| 3 | kubectl get pods |
list all running pods |
| 4 | kubectl get pods -o wide |
same but with more info |
| 5 | kubectl describe pod [podName] |
show pod info |
| 6 | kubectl get pods [podName] -o yaml |
Extract the pod definition in YAML and save it to a file |
| 7 | kubectl exec -it [podName] -- sh |
Enter into interactive mode |
| 8 | kubectl delete -f [pod-definition.yml] |
Delete a pod |
| 9 | kubectl delete pod [podName] |
Delete a pod |